Showing posts with label Our Home. Show all posts

Saturday, January 4, 2014

Master Bedroom Makeover

Our master bedroom makeover began due to our desire for a new bed. The bed and mattress that we were sleeping on may have been in its 20s (believe me, I know how gross this is). 

Interior design projects tend to snowball for me, so the new bed lead to new bedding and accessories to match (am I the only person whose heart skips a beat in the Homegoods lamp section?). 

I was never happy with the color of the walls -- the chip looked taupe but the color read very green and too dark for my liking.  We decided to go with a light grey which really brightened things up.

One of my favorite additions to our new bedroom is the sign that hangs above the bed. I think it speaks to our relationship. I had it custom made from a talented lady that has an Etsy shop that you can find here.

There are still a few things that I'd like to change but overall I'm really happy with our new and improved boudoir!

Before:

After:


Monday, May 13, 2013

Garage Studio Makeover

My hiatus from blogging has been due largely in part to this garage turned studio makeover. I've been wanting to take on more food and product photography work and felt that a studio space at home would enable me to get more done, especially at night. 

My hope was to create an inspiring space while still embracing the industrial feel of the garage. I dedicated a pinterest board and created a mood board before starting the process. It helped to have all of my ideas and inspiration in one place.

After painting and power washing the garage (I could go the rest of my life without painting another ceiling, letmetellyou), it was time for the fun part! Lots of decorating and re-purposing. My most favorite elements are my great grandma's vintage ceramic table and the painting on my desk created by my niece, Addie.

Without further ado, I present you with my new workspace!


I made most of the word art, with the exception of the lovely "With brave wings she flies", which was made by the uber talented, Danielle Burkleo. Rugs, wall ledge, picture wire and clips, white tables and graphic pillows are from Ikea. Most everything else you see was re-purposed from my college apartment.

Right now the other side of the garage looks like this:


I have some studio lighting and a variety of backdrops arriving this week that will need to be set up. I hope to use the table for product and food photography.

Some things I still want to do to the space:

- Put up new ceiling lights (maybe something on a track)
- Add a screen to the opening of the garage for when I work at night
- Paint the door that goes into the house black or a fun color like red or turquoise
- Paint the chairs to the vintage table a high gloss bright yellow


I'm really looking forward to working in this space!

Wednesday, March 27, 2013

Dining Room Makeover: Stage One

You may have noticed that I've been on a budget design kick lately. I've been freshening things up using paint, some inexpensive elements like fresh flowers and indoor plants and lots of elbow grease. It's made a huge difference in our home this spring.

I'm very sensitive to the environment that I live in. As the daughter of an interior designer, I believe it's in my genes. I don't feel like myself if the space that I live in isn't put together. We live in a fairly small home, so every inch counts when it comes to decorating our space.

Our latest makeover has made the biggest impact thus far. First, I must explain a little about our former dining room... This was the space that got the least love when we moved in. Since this room is tucked away in the back of our house, it was left neglected. Oh, and for some reason I thought painting the room a dark color would make it feel more formal? Not my best idea.

Our dining room pretty much gave me heart palpitations. It felt like a small crowded brown dungeon. I was craving some light with space to entertain in. That's where the idea of building a banquette or adding a settee and rotating the table came in. We figured this would give us a few feet of extra space (and boy were we right!).


I was certain that the cost to add a banquette/settee was not in the cards for us. It just so happened that the Homegoods gods shined down on us. We found our settee for under $350 and I had a hefty store credit to apply towards the balance. I've made it my mission to sell some of our older furniture and lamps on craigslist to make up the difference in cost. The new chandelier cost us $20 out of pocket, because of a return that we made which offset the price.

The rest of this redesign was a $30 can of paint, and me climbing up and down a ladder 165 times to paint the room. All totally worth it in the end, though.

I call this "Stage One" because there are some things I would like to add. A neutral runner down the center of the table, two large natural fabric throw pillows to flank each end of the settee (maybe with a pop of color), a light colored area rug for under the table and some wine storage.

My next project will be to tackle the big empty wall pictured below. I'm hoping to find a long buffet at a thrift store that I can refurbish. I'd like to add a large gallery wall of white frames with some of my favorite photography.


Overall I'm really happy with the room. It honestly feels like we put an addition on our house! I'll be sure to check in with stage two down the road.


Wednesday, March 13, 2013

Budget Makeover: Record Stand

Something about spring makes me want to clean up, organize and make things over. I think it's more than the arrival of warm weather that's pushing me to change up our space.

We recently celebrated the three year anniversary of moving into our home. I was 22 and fresh out of college when we bought our house. In the past three years my design tastes have grown and evolved. I've spent a lot of time pouring over design magazines, watching home improvement shows and visiting design blogs. I've even been lucky enough to work a little bit in the interior design industry.

All this to say, I've been feeling like a lot of our home doesn't really reflect us.

We are on a super tight budget (I'm talking pennies, people) so I'm challenging myself to use what we already own combined with a little creativity and elbow grease. I'm hoping that a few mini budget makeovers throughout the house will freshen things up and make our space look more like us.

For our first mini makeover, I took on our record stand. It certainly had potential, but felt kind of dark and cluttered. While scouring the Internet for inspiration, I came across this beauty and felt inspired. 

I'm not afraid of color, so I headed out for some vibrant orangey coral paint (Sassy Peach by Valspar, to be exact) and got to work. The end result:


I'm super happy with the way it turned out! If you'd like to make over your own wood furniture follow these steps:


1.) Bring the piece outside or into a well ventilated area.
2.) Lightly sand all over and then wipe down with a clean damp rag.
(make sure your surface is completely clean of dust before proceeding)
3.) Prime. Some people skip this step, but I think it makes all the difference. I used spray primer.
4.) Paint. I brushed the paint on, but you can roll or spray paint.
5.) To create the dip dyed effect on the legs I waited for the peach paint to dry and then used blue painter's tape to tape around each leg, I applied 3 coats of metallic acrylic paint below the tape on each leg and on the X base. 
6.) Peel off the tape and use a small brush to touch up any smudges or mistakes.

I'm hoping to keep this momentum going throughout our house. I'll be sure to share any future projects!


Do you have a place in your home that you've been dying to make over? 

Monday, January 21, 2013

Office Nook Makeover

As I've started to spend more time editing photos and working on my home computer, I've felt the need to makeover my upstairs office nook. It's a small little space, but it fits everything I need and is pretty cozy.

I chalkboard painted the main wall of the space, hung a shelf and added some of my favorite odds and ends from around the house. Do you ever shop inside of your own home? It's one of my favorite things to do. Whenever I hang a new shelf or just want to change things up - I take stuff from different rooms and pull things out of the garage and rearrange them. It's definitely a great way to freshen up a space on a budget.

Without further ado, my new workspace:


I'm still wanting to add a pop of color and some more storage solutions, but overall I'm really happy with the change.


Monday, December 3, 2012

Christmas via Instagram

This weekend we decorated our humble abode for the holidays. Jake and I danced around the house to the Pandora Christmas station - each of us singing our hearts out. Jake's rendition of Mariah Carey's, "All I want for Christmas" could surely skyrocket him into Youtube stardom.

   I snapped some instagrams of our decorations. I failed to get a photo of Penelope in her Christmas PJs. I promise I will try my best to capture this before the season is over, it's a must see.

P.S. If you're wondering why the bottom 2 feet of our tree remain ornamentless? Her name starts with a P and ends with enelope.

Wednesday, September 19, 2012

Bonus Room In Progress

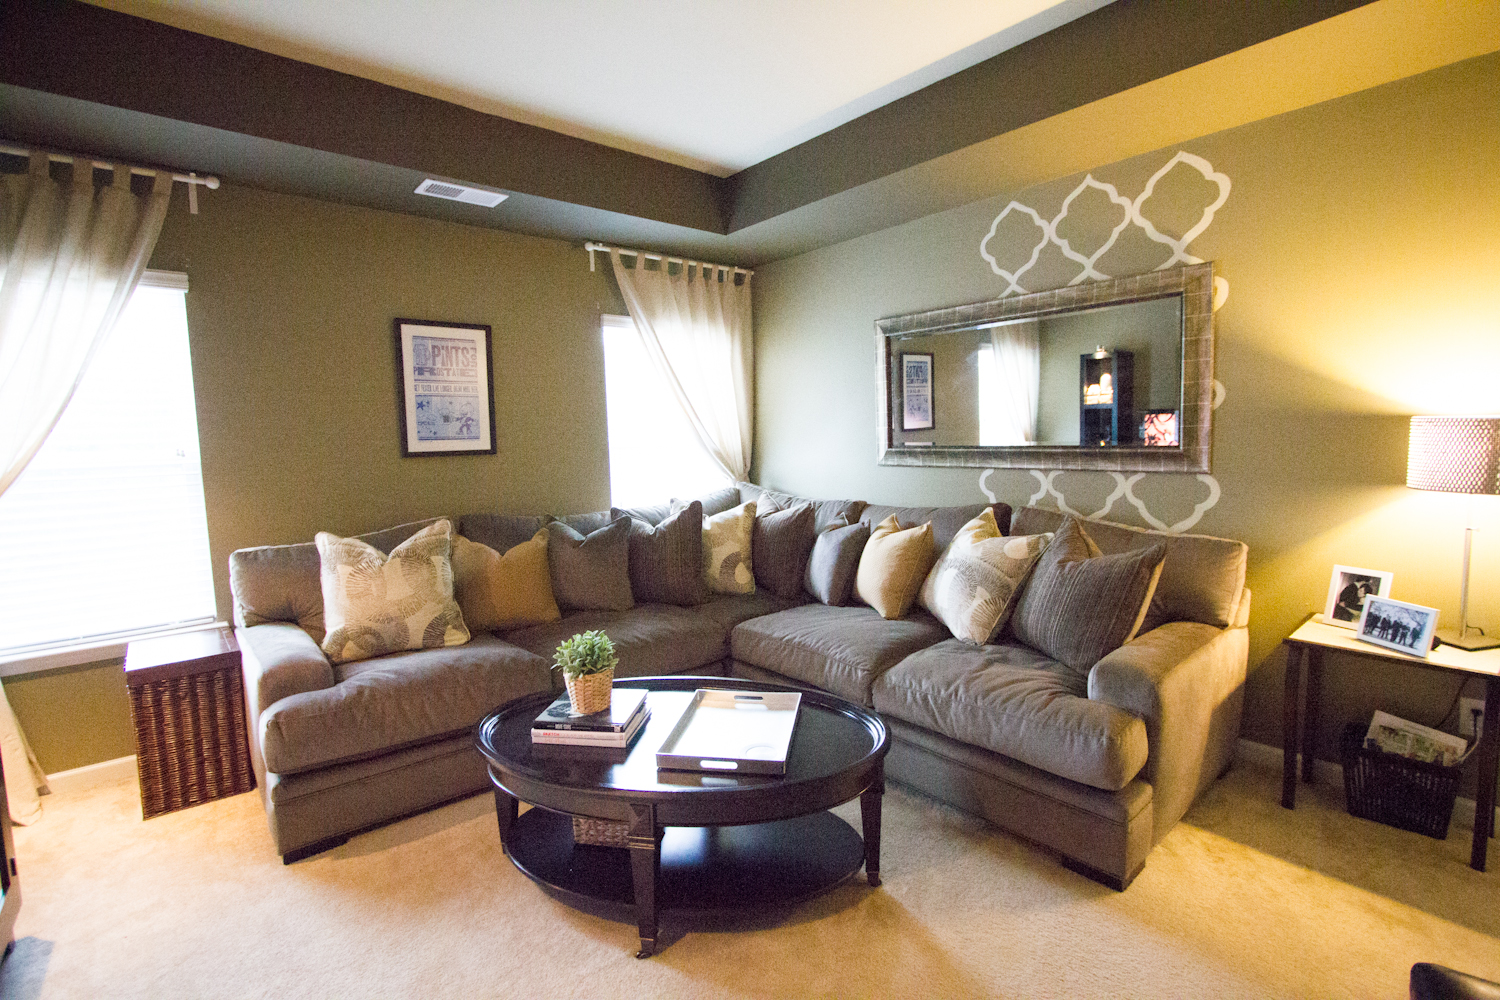
I've been working on decorating our upstairs T.V. room, or bonus room, as we call them down south. This room is pretty much where everything that didn't fit in any of our other rooms has gone to live. I've made an effort lately to edit out some of the junk.

Last week we got a new couch, which motivated me to get a move on with finishing this room. In a better effort to share just how strange I truly am, it's only fair that I disclose that I named our couch Sophia Lauren. I call her Sophie sometimes, for real.

Rather than my usual before and after posts, I thought it might be cool to give a sneak peek of the room "in progress" and share a list of what I would like to eventually do. Once everything is finished I will share the before pics (which are quite grotesque) and the afters (with Sophia Lauren in all of her glory - girlfriend loves herself some pillows).

(For all of you creepers, that is Flipping Out on the T.V. - I love Bravo like no other.)

Bonus room to do list:

1.) New ceiling light fixture.

2.) Finish the wall design. I started painting the trellis pattern and then gave up on it. At first, I wanted to do the entire back wall -- but now I am thinking of just adding 2 more columns that would line up with the space behind the mirror. What do you think I should do? Oh, and if you suggest painting the entire wall, then you might need to grab a paintbrush and help a sister out.

3.) Add a word art canvas to the left wall behind Sophie. I have an old piece of art that I can paint over, which would keep cost down. I think what we have up now is too small in scale for the wall.

4.) Get a bar/ credenza for the wall where the guitar is. We want to have a place for storage and snacks/beverages. I was thinking that a tall, long and not too deep piece might fill the space nicely. I'd love to find an antique if we can.

5.) Area rug. I saw one at Ikea for $19.99 that I'm a big fan of, can't beat those Swedes' prices!

6.) Find a few cozy matching throws to keep Sophia Lauren warm in these cold winter months. Okay, I'll stop now.

Any suggestions? I'm all ears.

Sunday, August 12, 2012

Guest Room Makeover

Jake and I have been hard at work this weekend with house projects. Jake cleaned out the horror that was our garage. We still want to work on organizing and would like to put in shelving, but for now I am very happy with the improvement.

We also redecorated one of our guest rooms. When we moved into our house we put most of our energy into getting our bedroom decorated, and spent a little bit of money and time on our other guest room - but we left this guest room totally untouched. Rather than leave the room empty, we used some old bedding and curtains that were handed down to us... Lets just say it was not our taste.

My goal was to make this room light and airy, welcoming for guests and relaxing - a breath of fresh air, if you will. With a small budget (less than $300) Jake and I headed to Ikea to see how far we could stretch our money. And stretch it we did!

Without further ado, our guest room makeover...


For those of you that would like the breakdown; the artwork above the bed, bedding, window treatments, plant, tray and candles are from Ikea. The green pillow, sheets and bud vase are from Homegoods and the bed skirt is from Target.

There are still a few things that I would like to add as finishing touches. I really want to utilize the wall space around the TV by creating a huge floor to ceiling gallery wall with photos of our friends and family. I'd also love an upholstered headboard with nailhead trim and a chandelier, kind of like the ones below.


As the daughter of an interior designer, I feel like I am constantly wanting to change things around here. Is there an area of your home that you are itching to makeover?

Back to Top