Thursday, March 28, 2013

Adelaide Turns Four

Today is my oldest niece, Adelaide's, fourth birthday. To say I love this little girl would be an understatement. After all, she made me an aunt, one of my most treasured roles on earth. In honor of turning another year older -- here's a quick look inside of Addie at 4:


There are countless reasons why we love you, sweet Addie. You've changed our family for the better. I get so much joy out of watching you grow. Happy birthday, little one! 
Love, Aunt B

Wednesday, March 27, 2013

Dining Room Makeover: Stage One

You may have noticed that I've been on a budget design kick lately. I've been freshening things up using paint, some inexpensive elements like fresh flowers and indoor plants and lots of elbow grease. It's made a huge difference in our home this spring.

I'm very sensitive to the environment that I live in. As the daughter of an interior designer, I believe it's in my genes. I don't feel like myself if the space that I live in isn't put together. We live in a fairly small home, so every inch counts when it comes to decorating our space.

Our latest makeover has made the biggest impact thus far. First, I must explain a little about our former dining room... This was the space that got the least love when we moved in. Since this room is tucked away in the back of our house, it was left neglected. Oh, and for some reason I thought painting the room a dark color would make it feel more formal? Not my best idea.

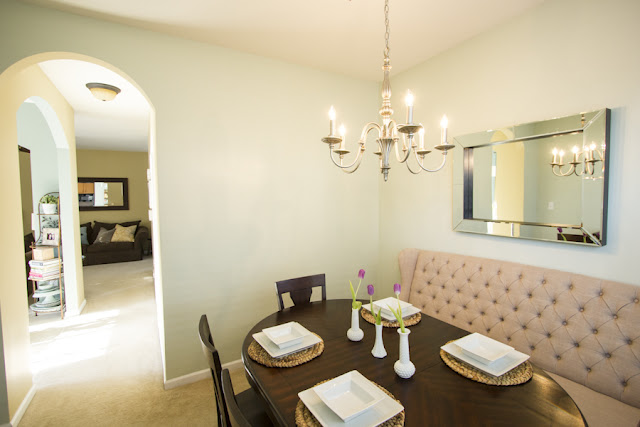
Our dining room pretty much gave me heart palpitations. It felt like a small crowded brown dungeon. I was craving some light with space to entertain in. That's where the idea of building a banquette or adding a settee and rotating the table came in. We figured this would give us a few feet of extra space (and boy were we right!).


I was certain that the cost to add a banquette/settee was not in the cards for us. It just so happened that the Homegoods gods shined down on us. We found our settee for under $350 and I had a hefty store credit to apply towards the balance. I've made it my mission to sell some of our older furniture and lamps on craigslist to make up the difference in cost. The new chandelier cost us $20 out of pocket, because of a return that we made which offset the price.

The rest of this redesign was a $30 can of paint, and me climbing up and down a ladder 165 times to paint the room. All totally worth it in the end, though.

I call this "Stage One" because there are some things I would like to add. A neutral runner down the center of the table, two large natural fabric throw pillows to flank each end of the settee (maybe with a pop of color), a light colored area rug for under the table and some wine storage.

My next project will be to tackle the big empty wall pictured below. I'm hoping to find a long buffet at a thrift store that I can refurbish. I'd like to add a large gallery wall of white frames with some of my favorite photography.


Overall I'm really happy with the room. It honestly feels like we put an addition on our house! I'll be sure to check in with stage two down the road.


Friday, March 22, 2013

Seize the Weekend Vol. 6

Seize the Weekend is a weekly feature on No Place Lyke Home. I've scoured the Internet in search of five crafts/recipes/projects that are easy to tackle in a weekend. My hope is to inspire others (and myself) to roll up our sleeves and get creative!


1. Make these lemon ricotta pancakes from Sugar & Charm. Something about spring makes me crave tart and fresh flavors.

2. Try out a few dos from A Beautiful Mess' 20 Hair Tutorials We Love post. There are some great looks for warmer weather. It must be on it's way soon, right?

3. Throw an egg decorating party to get ready for Easter. The always inspiring Design Sponge shares an inside look at their party including some unusual egg designs.

4. Learn something new in the kitchen. If there's a certain area of cooking that you would like to improve on, head over to Martha Stewart's Cooking 101. It's filled with tons of short, easy to follow videos on how to do everything from chiffonade herbs to properly fillet a fish.

5. Restyle a corner of your home to reflect your personal style. I touched a little bit on this last week with our record stand makeover. I think it's so important to live with what you love. Shelley over at The House of Smiths walks you through how to take on projects in an approachable manner. She's all about doing what you can now with what you have.

I took a page out of Shelley's book and recently restyled a pair of shelves in our family room. I love the family photos that were on the shelves and moved them elsewhere, but I wasn't happy with the overall look going on. They didn't really scream us.

I applied a fresh coat of spray paint, and grabbed some meaningful objects from around the house and voila.


With the addition of a horseshoe from the racetrack near the town that we met and grew up in, a vintage dog that looks like Penny, my great grandma's books and my grandma's doily these shelves now hold a lot of sentimental value.

It cost me all of $3 and I feel so happy each time I walk by them. All this to say, don't hold yourself back from making over a space for lack of funds. If you look around at what you already have, there are probably lots of things that can be easily restyled to suit your personal style.


Now here's a song to dance to. Happy weekend!
White Nights by Oh Land on Grooveshark

Wednesday, March 20, 2013

26

Today is my 26th birthday. 
I'm now the same age my mother was when she had me. A difficult concept to wrap my mind around.

So much of our birthdays are spent being recognized by others. Cards, gifts, phone calls from old friends and far-away family. I usually end the day feeling very loved and celebrated. 

I can't help but think though, shouldn't our mothers get the same recognition? They gave birth to us, after all. Twenty-six years ago today my parents left for the hospital -- frantic, excited and I'm guessing slightly terrified. 

I picture my mom holding me and wondering what I would become... Who would I take after? What did life have in store for me? From my very first breath, she's been a constant source of strength. My guide to life.

For me, today is more of an anniversary. The 26th anniversary of the day my mother became a mom of two. The 17th anniversary of when she took me and my best girlfriends to have a sleepover party in a hotel, bless her. The 10th anniversary of when she threw my surprise sweet 16 party.

It's a date that marks all of the times that my mom stayed up late baking and decorating the ultimate birthday cake. It's a reminder of all the parties she planned and goodie bags she filled.

She's responsible for so many of the positive feelings that surround my birthday. I'm sure for her though, March 21st was often approached with apprehension, "I can't believe she's going to be 5, 10, 18..."

When I think about celebrating the day of my birth, it's my mother that comes to mind;
twenty-six and anxious to meet her baby girl.

Biltmore Estate & Asheville, NC

This past weekend we traveled to Asheville, NC with our friends Kellie and Paul. We stayed in a cottage in the Blue Ridge Mountains and played tourists for the weekend.

We were lucky enough to visit the gorgeous Biltmore Estate. Biltmore Estate is the largest private residence in the U.S. (over 178,000 square feet!) and was home to the Vanderbilts. I'll let the pictures do most of the talking.

They didn't allow cameras inside of the house (bummer), but I did snap some of the grounds. After a tour of the home, we had lunch at Stable Cafe, visited the winery and shops and had ice cream at Biltmore Creamery.

My favorite part of Biltmore Estate are the gardens. Even though most of the outdoor flowers aren't yet in bloom, the conservatory and green houses are packed with lots of beauty. My favorite, an entire green house dedicated to succulents and cacti!

We stopped in Biltmore Village and had a drink in The Bohemian, a really awesome "Antler Chic" hotel. The lobby feels like a swanky mountain lounge.


Eventually we made it into Asheville, a lively and artsy town nestled in the mountains. There are tons of great restaurants and lots of neat shops. We ate at Tupelo Honey Cafe and it was simply divine. The biscuits, oh lord, the biscuits.


Our beaches are great, but if you ever plan a trip to the Carolinas, don't neglect a visit to the mountains!

Monday, March 18, 2013

Food Photography Behind The Scenes


How do you take your food photos? It's one of the questions that I get asked most frequently by other bloggers. There are several important components, but I can't stress enough that it's virtually impossible to take appetizing food photos without great lighting.

For some of us, beautiful light can be found by propping a table up near a window. Even if you're using your cellphone to snap a pic of your latest recipe, natural light will give your photo dimension and make it look more true-to-life.

Here in lies the problem for many of us. What if we cook in the evening? The sun is usually down when I'm ready to serve dinner. This is what fueled my desire for an artificial lighting setup.

It was important to me that this setup be inexpensive, small enough to fit on my dining room table, easy to setup/ put away and that it was made with items that I could repurpose.

I was lucky enough to take a food photography course where I gained some great tips from my very talented instructor. Today I'm sharing what I've learned coupled with some of my own ideas that have worked well for me.

This lighting setup should take about 10 minutes to assemble, has only five components and costs less than $50! Here's what you'll need:


1.) 500 watt halogen work light. Most home improvement stores carry these for around $10.

2.) 5-in-1 reflector. I purchased mine here for under $20. You could also make a diffuser using things in your own home like a white bed sheet or t-shirt. I chose a 5-in-1 because I could use it for other photography purposes.

3.) Muslin clamps. They carry these at most home improvement stores or you can buy them here.

4.) White foam core board.

5.) Duct tape (I find myself constantly in awe by its limitless uses).


How to setup:


I use my dining room table, but any table large enough for what you are photographing would suffice.

1.) Set up two chairs (or anything sturdy and free standing) against the table. Put the chairs about the width of the diffuser apart. Clamp the diffuser to the chairs.

Hint: The diffuser is the inside part of the 5-in-1 when you unzip the reflector.

2.) Place the work light on another chair or step ladder behind diffuser (careful not to put it too close).

Tip: Experiment with the direction of light. Changing between backlighting and lighting from the side changes the feel and quality of light on your food. I usually do a variety of set ups for each dish so that I have more to choose from.

Caution: The work light gets very hot while on. Be careful not to touch it or to put it near anything flammable.

3.) Make reflectors out of foam core board and duct tape. Do this by cutting the foam core board in half. Reassemble the foam core board by wrapping it on the inside seam with duct tape (like a book). This will allow you to bend the foam core board and to use it as a free standing reflector (see picture above).

Tip: Experiment with how raising and moving the light may cause shadows and/or may change the way the light hits the food. I usually find myself moving the light around a little bit to get it exactly where I want it. Sometimes I stack a couple of books underneath it to get it at the proper height. If you see any unappealing shadows on your dish or on the table, adjust the placement of your foam core board reflectors.

4.) Set up food and props on table, turn on light, arrange reflectors where appropriate and get snapping!
 

Bonus Tips:

Once you've taken the leap to create a lighting setup, there are several things that you can do that will improve your food photos. I totally understand that not everyone has the budget for the list below. I took these things on over the course of two years, so please don't let this list overwhelm you:

Shoot in manual mode. Nothing gives you more creative control. If you shoot in auto your camera may expose the image based on the light coming from the window or from your work light. This can make your food underexposed/ dark. Check out my tutorials on shooting in manual here, here and here. There are tons of great YouTube videos out there that should get you started.

Start collecting food related props. I buy vintage cooking utensils at thrift stores and dishes that I love at places like Target and Homegoods. I collect cloth napkins and fabric scraps to fold to look like napkins. Different place mats are a great way to add texture to a photo. I recently purchased faux wood table tops on Amazon and am happy with the way they have changed up my photos.

Get creative with styling. I usually saturate my mind with food images that inspire me. This means visiting some of my favorite food blogs and looking at magazines and food photography books. I study what it is about the image that I love and think of ways to use them as inspiration moving forward. I plan on sharing more about styling in a future post.

Edit your photos. I know everyone doesn't have the budget to purchase editing software but, If you're ready to invest some money into creating quality images I suggest using Adobe Photoshop Lightroom. I took a fantastic online course geared towards Lightroom that really took my editing to the next level called, Super Photo Editing Skills.


I packed in a lot of information, so please feel free to comment with any questions that you might have.


Wednesday, March 13, 2013

Budget Makeover: Record Stand

Something about spring makes me want to clean up, organize and make things over. I think it's more than the arrival of warm weather that's pushing me to change up our space.

We recently celebrated the three year anniversary of moving into our home. I was 22 and fresh out of college when we bought our house. In the past three years my design tastes have grown and evolved. I've spent a lot of time pouring over design magazines, watching home improvement shows and visiting design blogs. I've even been lucky enough to work a little bit in the interior design industry.

All this to say, I've been feeling like a lot of our home doesn't really reflect us.

We are on a super tight budget (I'm talking pennies, people) so I'm challenging myself to use what we already own combined with a little creativity and elbow grease. I'm hoping that a few mini budget makeovers throughout the house will freshen things up and make our space look more like us.

For our first mini makeover, I took on our record stand. It certainly had potential, but felt kind of dark and cluttered. While scouring the Internet for inspiration, I came across this beauty and felt inspired. 

I'm not afraid of color, so I headed out for some vibrant orangey coral paint (Sassy Peach by Valspar, to be exact) and got to work. The end result:


I'm super happy with the way it turned out! If you'd like to make over your own wood furniture follow these steps:


1.) Bring the piece outside or into a well ventilated area.
2.) Lightly sand all over and then wipe down with a clean damp rag.
(make sure your surface is completely clean of dust before proceeding)
3.) Prime. Some people skip this step, but I think it makes all the difference. I used spray primer.
4.) Paint. I brushed the paint on, but you can roll or spray paint.
5.) To create the dip dyed effect on the legs I waited for the peach paint to dry and then used blue painter's tape to tape around each leg, I applied 3 coats of metallic acrylic paint below the tape on each leg and on the X base. 
6.) Peel off the tape and use a small brush to touch up any smudges or mistakes.

I'm hoping to keep this momentum going throughout our house. I'll be sure to share any future projects!


Do you have a place in your home that you've been dying to make over? 

Tuesday, March 12, 2013

Best Ever Chocolate Chip Cookies

I believe everyone should have a scratch-made chocolate chip cookie recipe in their repertoire. This one comes from my mama, which was inspired by Ghiradelli

 
Last week, our long time family friends came for a visit. We chose to bake up some chocolate chip cookies. Is there a better way to bond and catch up than cooking together in the kitchen? I think not.

After all of our hard work (and some taste testing) we ended up with the perfectly warm, gooey yet crisp, melty, chocolatey goodness below.

Recipe yields 4 dozen cookies
 
Ingredients: 

11 1/2 ounces chocolate chips (we love the Ghiradelli premium semi sweet chips)
1 cup butter or margarine, softened
3 teaspoons vanilla
2 large eggs
3/4 cup brown sugar, packed
3/4 cup sugar
2 1/4 cups unsifted flour
1 teaspoon baking soda
1/2 teaspoon salt

Directions:

Heat oven to 375ºF. Stir flour, baking soda and salt together; set aside. In a large mixing bowl, beat the butter with sugar and brown sugar until creamy. Add eggs and vanilla to sugar/butter mixture, one at a time and mix on low until incorporated. Gradually add and blend dry mixture into cream mixture. Stir in chocolate chips by hand. Drop tablespoons of cookie dough onto cookie sheets. Bake for 9 to 11 minutes or until golden brown.

Enjoy!

Tuesday, March 5, 2013

Married Without Children

 America by Simon & Garfunkel on Grooveshark

Lately, I've been all about bringing my camera along to capture snapshots of our everyday life. Things we love to do, that I don't ever want to forget. 

We often focus on documenting the wedding, arrival of a new baby, children's big milestones etc. But there's something about right now that feels worthy of being remembered. Married without children. The middle, if you will. 

This confuses some people on the outside looking in. When are you two going to have children?  The trap... Sometimes those outside voices start to seep in and sound like my own. I feel constant pressure to hurry up and get to the next stage of our lives.

I get so caught up in the race, that I forget how important right now is. Married without children does have its perks. We get to do things like browse through our favorite record store on a Saturday at our leisure. We can be totally spontaneous and make decisions with little forethought or planning involved. 

Best of all, we've had time to focus on one another. We've been working on building a solid foundation before we grow our family. 

I'm beyond excited for the day that we have children of our own, but right now I'm enjoying spending way too much (uninterupted) time looking for the right Simon & Garfunkel album.


Monday, March 4, 2013

A Sort of Kind of Outfit Post (of the plus size variety)

This pseudo outfit post came as quite the surprise.

Some back story... I've been working towards having my husband, Jake, assist me as a second shooter with my photography business. This weekend, I took him out to teach him the ropes with my camera and I ended up being his subject. I'm pretty much never in front of the camera, so I felt sufficiently awkward, but went with it.

Later that night, while browsing through the photos that Jake took, something struck me. Lots of the blogs that I follow create outfit posts, but I don't think I've ever seen one for us ladies of the plus size variety. I'm all about embracing what you've got -- be it a little or a lot -- so I figured I would, gulp, share some of the photos on the blog.


It's not always easy to find cute/ current looking clothes in larger sizes, so I'm happy to share where each piece came from:

Boots: Hunter Huntress wide-calf rain boots: Saks Fifth Avenue
Top: H&M+ Sizes 12-24
Denim: Torrid

Major props to Jake for taking these!

Friday, March 1, 2013

Spring Wish List


In honor of the first day of my birthday month, I thought I'd share some items I've been lusting over. Any one of these would make a fabulous gift hint hint. 5 out of 9 of these are for the kitchen, of course!

1. Sterling silver knuckle rings // 2. Tarte Lipstick in Foxy (a punchy pink) // 3. Diana Mini toy camera with flash // 4. iPhone case // 5. Lovely aqua polka dot apron // 6. Print or digital subscription to Donna Hay Magazine // 7. Rifle Paper Co. labels and stickers // 8. Donna Hay Seasons cookbook (the photography in here is insanely gorgeous) // 9. Pretty rolling pin


What's on your wishlist?


Back to Top